 | Working With Data |
| Prev | Next |
Table of Contents
A data source in Kst is simply a supported data file. Currently, Kst supports ASCII text files, dirfiles, and NetCDF, for vectors and scalars, and FITS images, BIT image streams, 16 bit TIFF images, and any image format supported by QImage, (jpg, png, bmp, etc) for images.
The following concepts are important in understanding how Kst works with different data sources. Some terminology is also introduced in this section.
Data in Kst are accessed by field names. A field name can refer to a single scalar or string, to a vector of values from a single sensor, or to a matrix. For example, a column in an ASCII data file can be read in as a vector. An image in a png file can be read in as a matrix. Datasource readers provide functions for reading and obtaining fields and field names.
When reading in a vector from a data source field, data are addressed by their Frame number, not by their sample number. Each field in a data source has its own fixed number of samples per frame.
For some data sources (eg, ASCII files) every frame contains exactly one sample (ie, for ASCII files, a frame is a valid row of data, and every row has exactly one sample for each field).
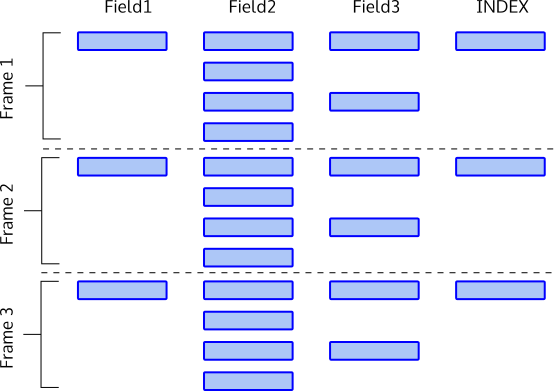
However, for other data sources (eg, dirfiles), there may be multiple samples per frame. In the illustration below, the first 3 frames of an imaginary dirfile are shown. In this particular data file, Field1 has a 1 sample per frame, Field2 has 4 samples per frame, and Field3 has 2 samples per frame. Every field must have a constant number of samples per frame throughout the file.

In the figure, imagine that time proceeds from top to bottom. Kst assumes that the first sample in a frame is simultaneous for every field in the data source, and that the rest of the samples are sampled evenly throughout the frame, as shown.
When plotting one vector against another, Kst assumes that the first and last samples of each vector are simultaneous, and interpolates the shorter vector up to the resolution of the longer vector. Since only the first sample in a frame can be assumed to be simultaneous across fields, when Kst reads data into a vector, it only reads up to the first sample of the last frame requested, so that plotting one vector against another will make sense. The rest of the last frame will not be read.
So if the first three frames of Field1 and Field2 are read from the data source in the figure, 3 samples will be read from Field1, and 9 samples will be read from Field2 (ending at first sample of Frame 3) - not 12 as one might expect.
As well as the explicit data fields in a data file, Kst implicitly creates an INDEX field for all data sources. The INDEX field is 1 sample per frame, and simply contains integers from 0 to N-1, where N is the number of frames in the data file. It is common to plot vectors against INDEX. This is convenient since the INDEX of a sample or event is just the frame number, allowing easy identification and retrieval of events from a data file.
Kst is capable of reading vectors from a wide range of ASCII formats. As long as the data are in columns, and as long as each non-comment row has the same number of columns, Kst can probably read it.
Consider reading this simple ASCII csv file: each comma separated column represents a field.
Length,Width
m,m
1.1,6.2
2.4,9.3
4.3,4.7
5.2,8.8
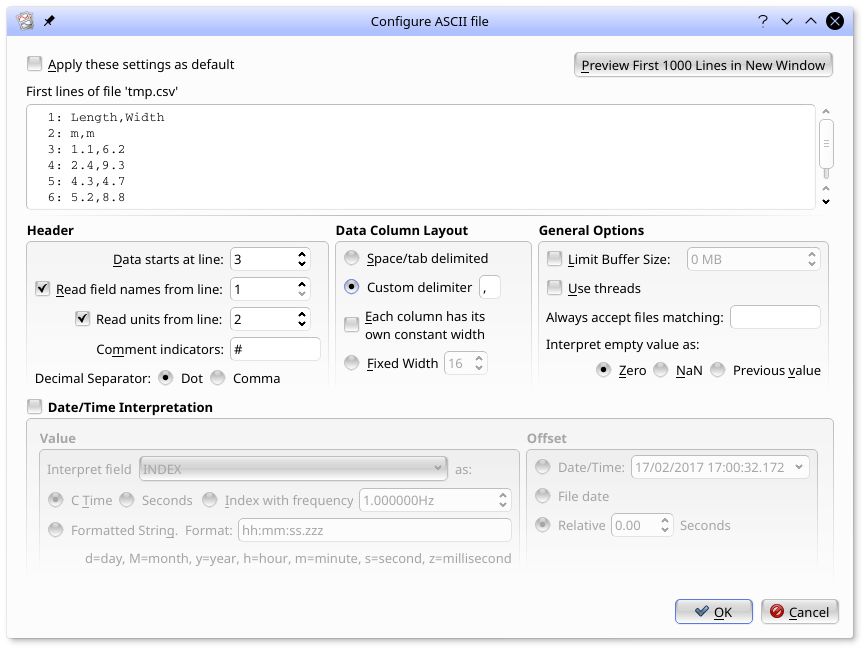
When you enter an ascii source into a data source selection widget (such as on the first page of the data wizard) the file will be identified as an ASCII file, and the button will be enabled, as shown below.

Clicking on will bring up the ASCII data source configuration dialog.

Note that the first few lines of the file are shown. The dialog in the screen shot has been filled out to read this file: looking at the first lines of the file, we see that data starts at line 3, line 1 holds the field names, and line 2 holds the units (which will be used by Kst in plot labels). Additionally, as this is a csv file, a "," has been selected as the Custom delimiter. Selecting OK will assign this configuration to this file. Kst will continue to use this configuration with this file until the configuration options are changed again in this dialog, or until in the menu is selected.
| Prev | Contents | Next |
| Filters | Up | The Data Manager |